 login
loginBuilding my own jogger
-
 No new posts


| Moderators: k9car363, alicefoeller | Reply |
|
 2012-07-05 5:53 PM 2012-07-05 5:53 PM |
Extreme Veteran  454 454   Canton, MI Canton, MI |  Subject: Building my own jogger Subject: Building my own joggerThis is a long post, I hope I won't bore you guys. It's kind of a semi-document of what I was up to since the beginning of this year.
I start off by... dreaming. After seeing all those flimsy stroller I am surprise they could pass safety test. With all those bicycle parts in my basement, I start putting some of my thought on paper. With a semi-bicycle junkie + motornut background I conclude with the following design principle:
That said, its still a valid option.
If I redesign it again, I probably move the front bar more toward the front, or backward to the rear and hide it under the seat. But its too late now. Another minor problem. I plan for the width of the bracket, but never thought of the seat. The seat end up overlapping each other.
Edited by yorkee 2012-07-05 6:05 PM |


| 2012-07-05 6:19 PM in reply to: #4296254 |
Expert 900 | Subject: RE: Building my own jogger Pretty Cool!! |
| 2012-07-05 6:42 PM in reply to: #4296254 |
Extreme Veteran 645 Media, PA | Subject: RE: Building my own jogger Some nice ideas there. One observation; it doesn't look like there is any steering capacity. Are you planning on skid-steering / sliding the front wheel? |
| 2012-07-05 7:04 PM in reply to: #4296254 |
Extreme Veteran 833 Strong Beach, CA | Subject: RE: Building my own jogger Nice, but why steel instead of aluminum? |
| 2012-07-05 7:08 PM in reply to: #4296254 |
Master 2236 Denison Texas Denison Texas | Subject: RE: Building my own jogger Very cool. How much does it weigh and what does that compare to commercial models? I am curious about the brake, would a "dead man" type brake be better in case you slip or fall and for some reason let go of the stroller be more useful than a regular brake? |
| 2012-07-05 7:09 PM in reply to: #4296254 |
Regular 101 | Subject: RE: Building my own jogger Awesome!As a dad who pushes two around that looks like a great set up. Only thing I'd say is get a wheel guard on that front one before it catches a foot or hand. |
| 2012-07-05 10:01 PM in reply to: #4296254 |
Master 1517 Grand Prairie Grand Prairie | Subject: RE: Building my own jogger Hey I noticed some bikes in teh background. As a new dad you should not ride or keep them, I will gladly take the bikes of your hand, completly free of charge!
Other than that: AWESOME! |
| 2012-07-06 7:58 AM in reply to: #4296311 |
Extreme Veteran 454 Canton, MI | Subject: RE: Building my own jogger tcj103 - 2012-07-05 7:42 PM Some nice ideas there. One observation; it doesn't look like there is any steering capacity. Are you planning on skid-steering / sliding the front wheel?
Thanks! I actually did put some thought into the steering but I didn't document it here... I originally look at some other running jogger steering, its either open wheel, lock wheel or hybrid. (There are some crazy steering system such as Peg Perego Duette but thats way too complicated) Usually the free open wheel is for normal stroller, design to go around goccery isles easily, but hard to keep it straight at running speed. The hardcore running jogger has fix steering so it will go straight. But it won't turn unless you lift/drag the front wheel. the hybrid one can open and lock wheel, but there's always a little bit unwanted free play from the locking mechanisms.
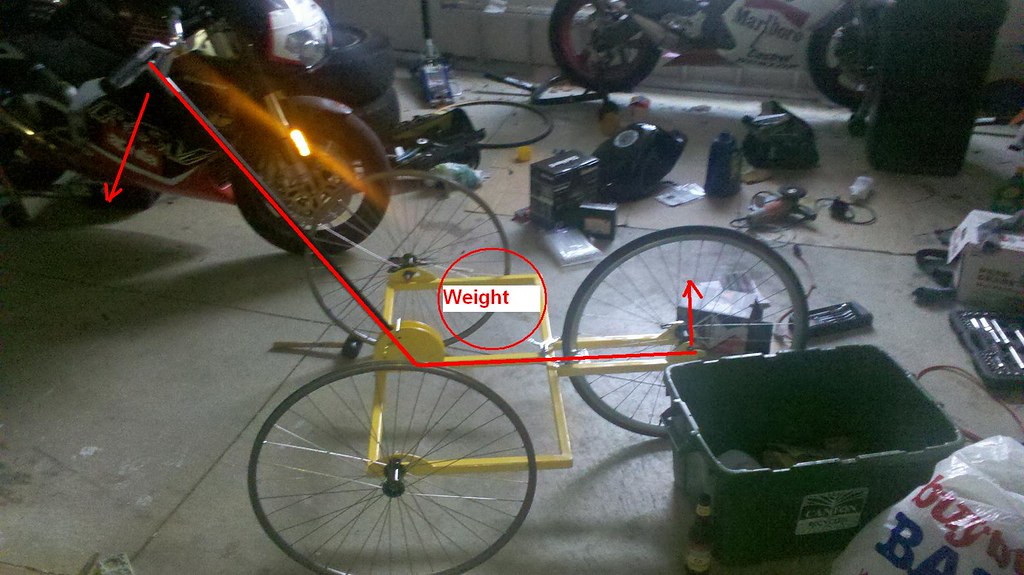
Base on the KISS principle, and since this is a running jogger, I go with the fix steering type. In addition, I put a longer then usual handle bar shaft. That create a lever effect to lift up the front wheel easily:
I tested it with empty stroller, it is very easy to lift the front wheel a little bit up, turn then put it back down. The only draw back is I feel I am so far from the stroller. I will try it with some weight after putting tire on. |
| 2012-07-06 8:01 AM in reply to: #4296343 |
Extreme Veteran 454 Canton, MI | Subject: RE: Building my own jogger jackson61802 - 2012-07-05 8:04 PM Nice, but why steel instead of aluminum?
I wish I can do it in aluminum. I didn't do it because I don't know how to TIG (or MIG aluminum). I will definitely go back to school and master those two skills and have a version 2.0 And yes, I already started jogger 2.0 in design! |
| 2012-07-06 8:09 AM in reply to: #4296348 |
Extreme Veteran 454 Canton, MI | Subject: RE: Building my own jogger Av8rTx - 2012-07-05 8:08 PM Very cool. How much does it weigh and what does that compare to commercial models? Haven't weight it yet, but it is heavy. I think its at least 40 lbs. That said, because of the big 700c wheels and the bicycle/handcycle grade hubs, it should have minimum rolling resistance. (At least thats what I wish) Perfect for flat surface, probably not so good for hills. Av8rTx - 2012-07-05 8:08 PM I am curious about the brake, would a "dead man" type brake be better in case you slip or fall and for some reason let go of the stroller be more useful than a regular brake? Good point, but dead man type of brake means you are holding the brake for 1/2 - 1 hrs during the run. Not sure if I want it do it. However, I did look into some clutch type of mechanism used by scooters and pocket bikes. But I don't know how to apply it to the stroller easily. I am all ears if you have any creative suggestions how to make a safe dead man type of brake, or anything that could prevent it to roll by itself. For now maybe I will put one of those surfing board type of strap on just in case of the slip and fall scenario... Edited by yorkee 2012-07-06 8:16 AM |
| 2012-07-06 8:13 AM in reply to: #4296349 |
Extreme Veteran 454 Canton, MI | Subject: RE: Building my own jogger sea2summit - 2012-07-05 8:09 PM Awesome!As a dad who pushes two around that looks like a great set up. Only thing I'd say is get a wheel guard on that front one before it catches a foot or hand. That's what my wife suggested too! I will skip the wheel guard until they glow up a little bit. Thinking of using a mtn bike mud guard in the front, and maybe fiberglass or abs to flab a fender on the side. I don't have to worry about it since I will be pushing them in car seat for now. |
| 2012-07-06 8:20 AM in reply to: #4296549 |
Extreme Veteran 454 Canton, MI | Subject: RE: Building my own jogger timf79 - 2012-07-05 11:01 PM Hey I noticed some bikes in teh background. As a new dad you should not ride or keep them, I will gladly take the bikes of your hand, completly free of charge! I gotta save them for my kids in the future :D good try! timf79 - 2012-07-05 11:01 PM Other than that: AWESOME! RushTogether - 2012-07-05 7:19 PM Pretty Cool!! Thank you! Love all the positive feedback! and love all the suggestions!
I probably didn't document enough here... My notes are all over the place. I will update it when I find anything missing. |
| 2012-07-06 8:26 AM in reply to: #4296254 |
Veteran 612 Kennebunkport, Qatar | Subject: RE: Building my own jogger Nice job! Like you said at 40# you probably won't want to do many hills, but if a deadman brake is desired you could always use a pinned set up that you attach to your wrist or clothes, like a kill switch on most ATV's. Welcome to the world of twins, I have 17yo twin daughters and it has been wonderful, just make sure that you have fun with people when they ask stupid questions
|
| 2012-07-06 8:29 AM in reply to: #4296857 |
Champion 10018 , Minnesota , Minnesota Bronze member Bronze member | Subject: RE: Building my own jogger Wow, I am impressed. I have toyed for years about how to build a jogging "cart" for myself - something to use for running errands, literally. I didn't need any safety measures or anything fancy, just something to toss in a few grocery bags. I ultimately ended up buying a really inexpensive jogging stroller from Walmart. The advantage is that it's not too heavy, and a wheel that I can lock or swivel, and the best feature - it folds up. I took off all of the strollery looking stuff (the baby seat and other fabric) and I am trying to find an adequate basket to fit withing the frame that is sturdy and lightweight. If you have any ideas, let me know... |
| 2012-07-06 8:55 AM in reply to: #4296254 |
| 43 | Subject: RE: Building my own jogger Awesome! I used to take my daughter out in a jogger when she was little. Pushing the handlebar down to get the front wheel up in corners worked perfectly fine for me. The only suggestion I have is this: Instead of holding the handle bar continuously while running it's easier and more comfortable to keep pushing the jogger away in front of you, alternating arms. For this to work, you probably want a straight handlebar with a decent amount of foam around it. |
| 2012-07-06 9:23 AM in reply to: #4296254 |
Expert 2192 Greenville, SC | Subject: RE: Building my own jogger for version 2.0 i would look at the attachment of the rear wheels a little more. seems like with two kids back there, as they get older it might cause some bending of the flange inward (rear wheel bracket). extending the flange bottom edge and welding it to the outside, rather than the top, of the square bar would have made it a little stiffer, or even adding in some triangular cut reinforcement pieces would work too. |
| 2012-07-06 9:58 AM in reply to: #4296254 |
Extreme Veteran 2098 Alberta | Subject: RE: Building my own jogger RE: deadman's brake. Our jogger had a wrist band and strap attached to jogger, so if you fell the jogger stopped with you... |
| 2012-07-06 11:03 AM in reply to: #4296254 |
Veteran 444 | Subject: RE: Building my own jogger Off topic! What's that little Marlboro two squeak motorcycle I see sitting back there on a paddock stand? Nice stroller by the way, push that up some hills for a killer workout! |
| 2012-07-06 11:33 AM in reply to: #4296254 |
Master 2236 Denison Texas | Subject: RE: Building my own jogger Nice Sketchup model BTW. Did you see if there were models of bicycle wheels to import and use. Yours has a Romanesque-chariot feel to it  |
| 2012-07-06 2:37 PM in reply to: #4296870 |
Extreme Veteran 454 Canton, MI | Subject: RE: Building my own jogger Mountaindan - 2012-07-06 9:26 AM Nice job! Like you said at 40# you probably won't want to do many hills, but if a deadman brake is desired you could always use a pinned set up that you attach to your wrist or clothes, like a kill switch on most ATV's. Welcome to the world of twins, I have 17yo twin daughters and it has been wonderful, just make sure that you have fun with people when they ask stupid questions
great idea about the pin setup! I will think about how to modify the bicycle brake caliper so the spring will pull in instead of push out. Probably won't be in this version. maybe in 2.0 will definitely have fun with twin questions |
| 2012-07-06 2:40 PM in reply to: #4296944 |
Extreme Veteran 454 Canton, MI | Subject: RE: Building my own jogger Fred... - 2012-07-06 9:55 AM Awesome! I used to take my daughter out in a jogger when she was little. Pushing the handlebar down to get the front wheel up in corners worked perfectly fine for me. The only suggestion I have is this: Instead of holding the handle bar continuously while running it's easier and more comfortable to keep pushing the jogger away in front of you, alternating arms. For this to work, you probably want a straight handlebar with a decent amount of foam around it.
thanks! Too bad I don't have straight bar around the house... I will see how it goes worst case scenario i may get a straight bar from craigslist or swap meet. |
 2012-07-06 2:45 PM in reply to: #4296278 2012-07-06 2:45 PM in reply to: #4296278 |
| Subject: ... This user's post has been ignored. |
| 2012-07-06 2:50 PM in reply to: #4297305 |
| Extreme Veteran 454 Canton, MI | Subject: RE: Building my own jogger Clempson - 2012-07-06 10:23 AM for version 2.0 i would look at the attachment of the rear wheels a little more. seems like with two kids back there, as they get older it might cause some bending of the flange inward (rear wheel bracket). extending the flange bottom edge and welding it to the outside, rather than the top, of the square bar would have made it a little stiffer, or even adding in some triangular cut reinforcement pieces would work too. The rear wheel attachment are 11ga (0.12 inches) thick plate. I thought it should be enough strength for running jogger, I guess I will see from testing after putting tires on. If I do it in aluminum I will definitely take your idea and brace it for more stiffness.
thor67 - 2012-07-06 10:58 AM RE: deadman's brake. Our jogger had a wrist band and strap attached to jogger, so if you fell the jogger stopped with you... Cool... that's probably the easiest solution. I will probably do that. Tiffanator - 2012-07-06 12:03 PM Off topic! What's that little Marlboro two squeak motorcycle I see sitting back there on a paddock stand? Nice stroller by the way, push that up some hills for a killer workout! That's a 20 yrs old Yamaha TZR250 V-twin I recently rebuilt. Maybe that's why I have twins...
Av8rTx - 2012-07-06 12:33 PM Nice Sketchup model BTW. Did you see if there were models of bicycle wheels to import and use. Yours has a Romanesque-chariot feel to it I should have done more homework prior to the build. Originally I thought about Cannondale lefty hubs or tricycle's hub. Neither is ideal. End up using sport wheel chair / hand cycle hub instead. Yeah I feel like its a chariot as well.. Indeed I am thinking about calling it Chariot |
| 2012-07-06 2:55 PM in reply to: #4297775 |
| Extreme Veteran 454 Canton, MI | Subject: RE: Building my own jogger FoggyGoggles - 2012-07-06 3:45 PM Nice project! What would you estimate the cost of materials to be?
Just the metal, around $70. (I am using some scrap) With the hub I am using, another $200 on top of it including the spokes. With the rest of this and that, and all the silly trial and error, probably another $100-200. Yes, its more expensive than buying a brand new running jogger. But the fact that I can say "I built a stroller for my kids"... PRICELESS!
Edited by yorkee 2012-07-06 2:57 PM |
| 2012-07-06 2:58 PM in reply to: #4297789 |
| Master 2236 Denison Texas | Subject: RE: Building my own jogger yorkee - 2012-07-06 2:50 PM Av8rTx - 2012-07-06 12:33 PM Nice Sketchup model BTW. Did you see if there were models of bicycle wheels to import and use. Yours has a Romanesque-chariot feel to it I should have done more homework prior to the build. Originally I thought about Cannondale lefty hubs or tricycle's hub. Neither is ideal. End up using sport wheel chair / hand cycle hub instead. Yeah I feel like its a chariot as well.. Indeed I am thinking about calling it Chariot I was referring specifically to the Sketchup rendering, you can import some things from the 3dwarehouse like this: http://sketchup.google.com/3dwarehouse/details?mid=4fcc3b1dfb43057704e9838e5b15da1&prevstart=0 Save yourself the tedious process of "reinventing the wheel' so to speak |
|
|
|
|
 View profile
 Add to friends
 Go to training log
 Go to race log
 Send a message
 View album